Reading a measuring tape looks complicated because there are so many lines packed into each inch. In practice, every reading comes down to two numbers: the whole inches, and how many sixteenths of an inch past that. This guide walks through the process slowly, with diagrams, and then gives you examples to check yourself against.
Everything here applies to a standard imperial tape measure, the kind marked in inches and feet. If your blade shows centimeters, jump to the metric tape guide.
1. Know the parts of the tape
Before reading numbers, it helps to know what you are holding.
- Blade: the printed, curved metal strip. The slight curve, called the concave, stiffens the blade so it can stick out in the air without folding.
- Hook (or tang): the metal tip at the end of the blade. It is loose on purpose — more on that below.
- Case: the housing that holds the coiled blade. Many cases have their length printed on the bottom or side, which matters for inside measurements.
- Lock: a slide or button that stops the blade from retracting so you can read it without holding tension.
- Belt clip: handy, but it can scratch soft surfaces such as finished trim, so turn it away from your work.
2. Read a measurement in five steps
Set the zero
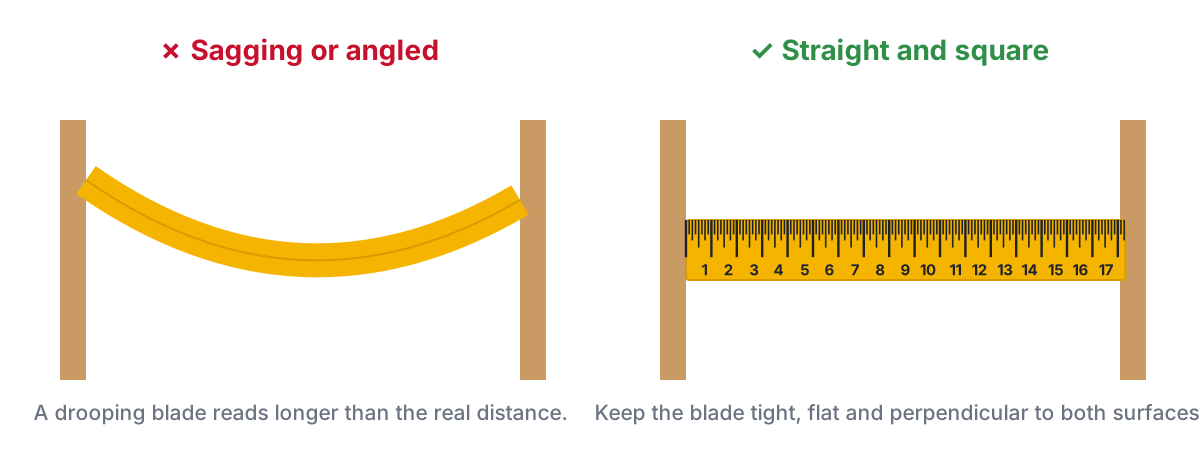
Hook the end over the edge of the board, or press it flat against a wall. Keep the blade straight and touching the surface along its length. A blade that sags or runs at an angle will read long.
Find your mark
Locate the exact point you want to measure to — the end of the board, a pencil line, the far wall. Look straight down at the blade, not from the side. Viewing at an angle can shift where the mark appears to land by a line or more.
Read the whole inches
Find the last large printed number before your mark. That is your whole-inch value. If your mark is between 5 and 6, you have 5 inches plus a fraction.
Count the sixteenths
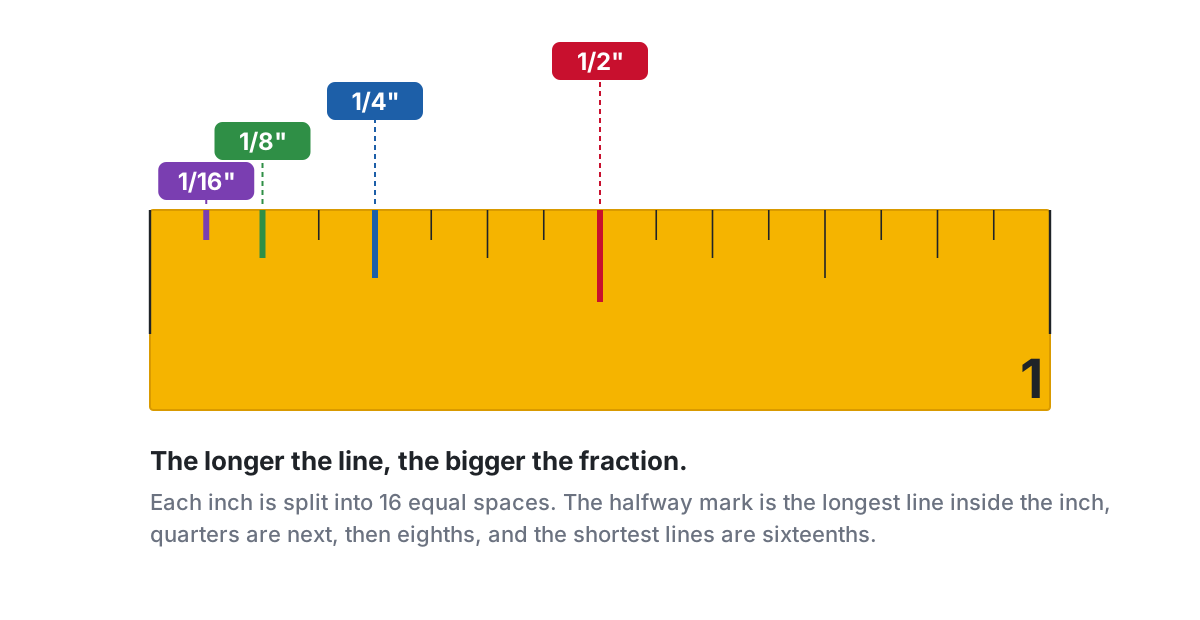
Count the lines between that inch number and your mark. On a standard tape, each line is 1/16 inch. Shortcut: identify the line by its length first. If it is the half-inch line, you already know it is 8/16. Count from there instead of from the inch.
Simplify and record
Reduce the fraction to its simplest form, then write the full measurement with its units. Ten sixteenths becomes 5/8. Twelve sixteenths becomes 3/4. Use the fractions chart if you need a quick lookup.
3. Worked examples
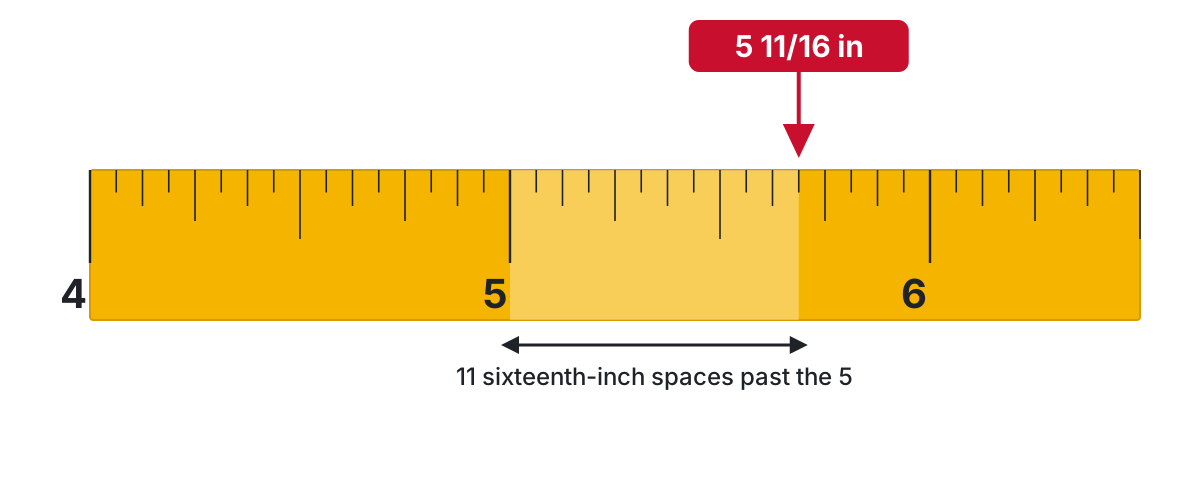
Example A: 5 11/16 inches
The mark is past the 5 but before the 6, so the whole number is 5. It sits three lines past the half-inch line. The half is 8/16, so 8 + 3 = 11 sixteenths. Eleven is odd, so the answer is 5 11/16 inches.
Example B: 12 3/8 inches
The board ends past the 12. The mark lands on a medium-short line, two lines before the half-inch line. That is 8 − 2 = 6 sixteenths, which simplifies to 3/8. The reading is 12 3/8 inches.
Example C: 30 3/4 inches
The mark lands on the second-longest line in the inch, after the half-inch line. That line can only be 3/4. Nothing to count. The reading is 30 3/4 inches, which can also be written as 2 feet 6 3/4 inches.
4. Reading feet and inches
Once you pass 12 inches, many tapes start showing feet. There are three common styles:
- Continuous inches: the blade keeps counting 13, 14, 15 and so on, with a red or highlighted foot marker every 12 inches.
- Feet + inches: after each foot the inch numbers restart at 1, with a label such as “1F” or “1′” in front. A reading of “2F 4” means 2 feet 4 inches.
- Both: a large inch count with small foot labels beside it. This is the most common layout on contractor tapes.
To convert feet to inches, multiply the feet by 12 and add the leftover inches. Example: 4 feet 7 1/2 inches is 4 × 12 + 7 1/2 = 55 1/2 inches. Working in total inches is usually safer when you are adding or subtracting measurements.
5. Measuring inside a space
For a window opening, a drawer or the inside of a cabinet, you can’t hook the blade over anything. You have two good options:
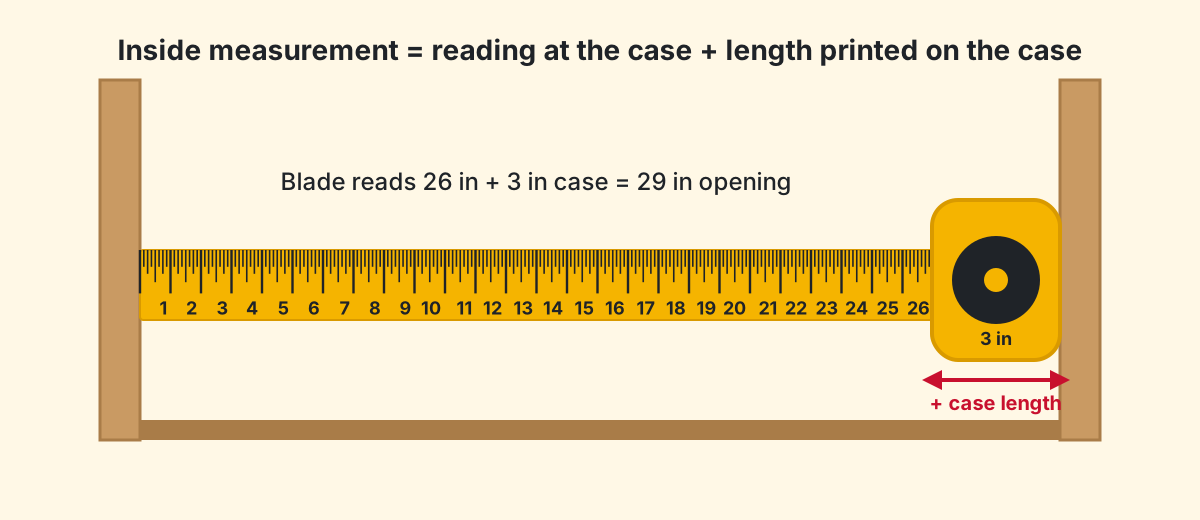
- Use the case length. Push the hook against one side and slide the case’s back against the other side. Read the blade where it meets the case, then add the length printed on the case. That printed length is usually 2 to 3 1/2 inches, depending on the model.
- Measure in two parts. Make a pencil mark at an easy number, such as 10 inches, from one side. Measure from the other side to the same mark. Add the two numbers together.
6. Mistakes that throw readings off
- Reading the wrong inch. The number you need is the one before your mark, not the nearest one. Reading 6 instead of 5 adds a full inch.
- Letting the blade sag. Over long spans, a drooping blade adds length. Lock the blade, keep it tight and support the middle if you can.
- Measuring at an angle. Keep the blade square to the edges you are measuring between. Even a few degrees off adds length over a long distance.
- Bending the hook. If the hook gets bent or the rivets wear loose, every measurement is off. Test it by measuring the same board hooked and pushed — the two readings should match.
- Mixing up tapes. Two tapes from different brands can differ slightly. Use one tape for a whole project.
- Losing track on long measurements. Write the reading down right away. Say it out loud as you write it.
7. Practice questions
Read each description and work out the measurement before opening the answer.
3 inches + the longest line inside the inch
The longest line is the half: 3 1/2 in.
8 inches + 10 small lines
10/16 = 8 5/8 in.
14 inches + 1 small line
14 1/16 in.
1 foot 9 inches + 12 small lines
12/16 = 3/4, so 1 ft 9 3/4 in, or 21 3/4 in.
Inside reading 31 1/4 in, case says 3 in
31 1/4 + 3 = 34 1/4 in.
6 inches + 15 small lines
One line short of 7: 6 15/16 in.
Next, learn what the red boxes, black diamonds and other symbols mean in Tape Measure Markings Explained.