A tape measure blade carries far more information than numbers. Some symbols are there to speed up framing work, some keep your readings accurate, and some exist only for legal or quality-control reasons. Once you know what each one is for, the blade stops looking cluttered and starts doing some of the work for you.
1. Inch and fraction lines
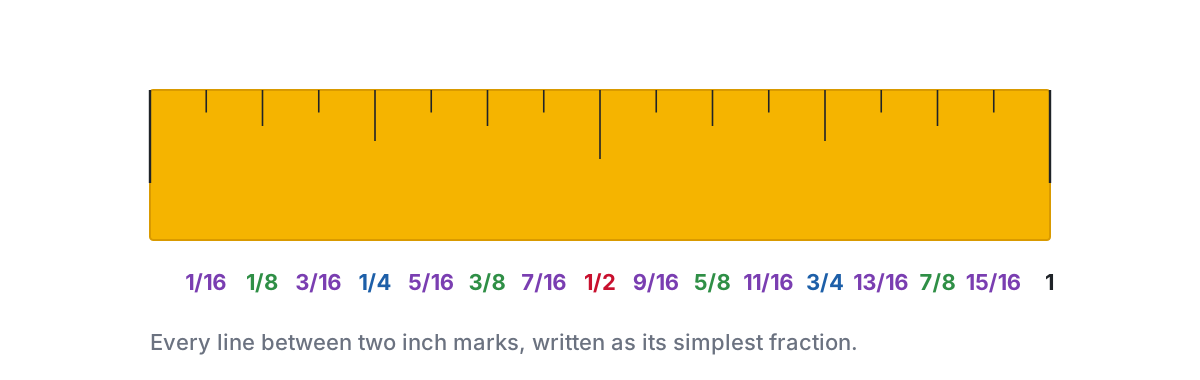
On a typical imperial blade, each inch is divided into 16 equal parts. The lines use five different lengths so your eye can sort them without counting:
| Line | Relative length | Positions inside the inch |
|---|---|---|
| Inch | Longest, with a printed number | Every whole inch |
| 1/2 inch | Second longest | 1/2 |
| 1/4 inch | Medium | 1/4, 3/4 |
| 1/8 inch | Short | 1/8, 3/8, 5/8, 7/8 |
| 1/16 inch | Shortest | 1/16, 3/16, 5/16, 7/16, 9/16, 11/16, 13/16, 15/16 |
Some tapes add even finer 1/32-inch lines over the first foot or so for detailed work. If your blade has more than 16 spaces between two inch numbers in that section, count in thirty-seconds there and switch back to sixteenths after.
2. Foot markers
Every 12 inches the blade marks a foot. Depending on the brand, you will see one or more of these:
- A red or black box around the 12, 24, 36 and so on.
- A small label such as “1F”, “2F” or “1′” next to the inch number.
- Inch numbers that restart at 1 after each foot, with the foot count shown beside them.
If your tape restarts the inch count, be careful: “3F 5” is 41 inches, not 35. When in doubt, convert to total inches by multiplying the feet by 12 and adding the inches.
3. Red 16-inch stud marks
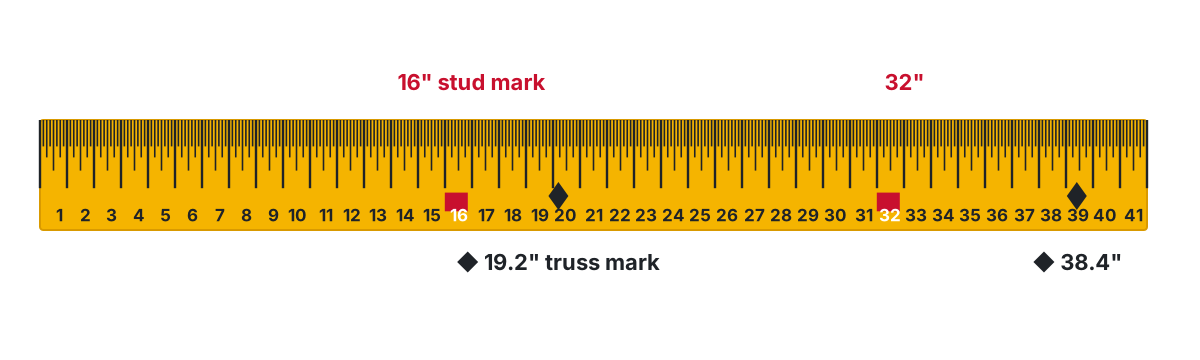
Many tapes highlight 16, 32, 48, 64 inches and every further multiple of 16 in red. In much of North American wood-frame construction, wall studs and floor joists are placed 16 inches apart, measured center to center. The red marks let a framer lay out a whole wall without doing any math: hook the tape on the end of the plate and make a mark at every red number.
4. Black diamonds (19.2 inches)
Small black diamonds — sometimes called truss marks or joist marks — appear at 19.2, 38.4, 57.6, 76.8 and 96 inches. The odd-looking number comes from dividing a standard 8-foot (96-inch) sheet of plywood or subflooring into five equal spaces: 96 ÷ 5 = 19.2. Spacing joists or trusses this way lets the edges of each sheet land on a support while using fewer framing members than 16-inch spacing.
If you are not framing, you can ignore the diamonds completely. They do not line up with any fraction line you would normally read.
5. The loose hook and “true zero”
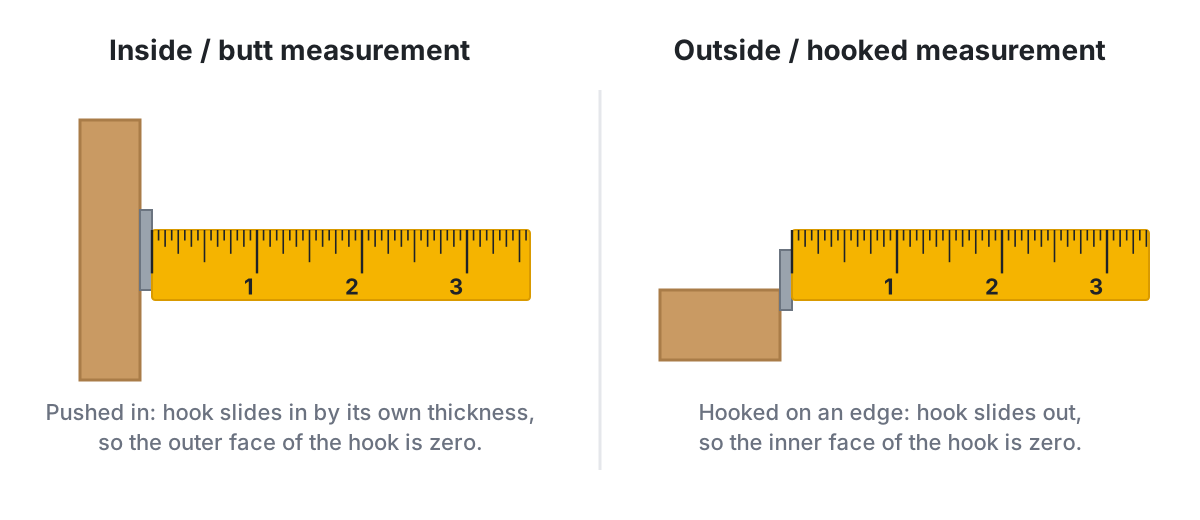
Almost everyone notices that the metal hook wiggles back and forth, and many people assume it is broken. It is designed that way. The hook slides a distance equal to its own thickness:
- When you hook the tape over an edge and pull, the hook slides out, so the measurement starts at the inside face of the hook.
- When you push the tape against a wall, the hook slides in, so the measurement starts at the outside face of the hook.
Either way, zero ends up exactly where it should be. This is often called “true zero”.
Quick test: measure a board by hooking the end, then measure the same board by butting the hook against a block at the end. If the two readings differ, the hook or its rivets may be damaged and the tape should be replaced for precise work.
6. The number on the case
Look at the bottom or side of the case. Many tapes print a measurement there, such as “3 in” or “3 3/8 in”. That is the exact length of the case from front to back. It lets you measure inside spaces: press the back of the case against one wall, read the blade at the case, and add the printed number. The step-by-step guide walks through an example.
7. Other things printed on the blade
- Accuracy class: tapes sold in Europe often show a Roman numeral such as “II” inside an oval. That is the accuracy class under EU rules for measuring instruments; class I is the tightest tolerance, class II is typical for building work.
- Standout or length labels: the blade’s total length and width are often printed near the start, for example “25 ft / 7.5 m”.
- Dual scales: some blades show inches on the top edge and centimeters on the bottom edge. Read only one edge at a time. See the metric guide for details.
- Reverse printing: a few tapes print numbers on the underside of the blade too, so the reading is visible when the blade is held upside down against a ceiling.
Putting it together
When you pick up a tape, sort the markings into two groups. The inch numbers and fraction lines are what you read. Everything else — red boxes, diamonds, labels — is a helper for specific jobs. Focus on the first group, and use the second only when your project calls for it. To practice converting what you read into decimals or millimeters, use the tape measure fractions chart.